Showing posts with label Daniel Tiger Party. Show all posts

December 5, 2013

Daniel Tiger Party Wrap-Up

The last project I have to show you from our party in the neighborhood of Make Believe is the cute banner for over the food:


Daniel Tiger always likes to refer to things as "De-licious!" and I thought that would be perfect to have with the cupcakes. The picture doesn't do justice to the cuteness this banner has :)

As always I started with MDS to make the banner. I used the pennant shape punches and filled them with my custom DSP. I was able to fit 6 to a page (imagine how huge this would have been if I made them bigger!!). Then it was just to add the letters to the center- or on the ends I added Daniel with a Trolley instead of a letter. Here is a close-up of the printed pages:


To wrap up the party I also wanted to show you a couple of other photos too. The bottle labels turned out so cute printed up- I even got orange and brown pop for the tiger theme :) Although... it helps if you remember to put out a pen for people to use to write there name on the bottle!!! Silly me with my sleep deprived brain.


And then here are a couple of toys I picked up to use as a center-piece. This seriously cute trolley goes 'ding-ding' as it moves- the kids all LOVED it. Of course the Daniel Tiger figurines were a must too :)


Well, I hope you've enjoyed this little adventure into the world of Daniel Tiger :) Or if you aren't a fan of the show (as I'm sure no person without small children is) I hope you got some party decor ideas out of it- just add your own theme and off you go!


Flutterby soon!

Pin It!

November 27, 2013

Daniel Tiger Cupcakes

What would a birthday party be without cute little cupcakes :)


I love cupcakes. They are so easy to make and then you can decorate them with cute little cupcake toppers. And don't you love the frosting on these? This summer I learned how to use icing tips- and it is SO EASY! I don't know why I was so scared of trying it out before- seriously... it looks nicer and is actually faster than trying to frost these bad boys with a butter knife. You've got to give it a try :)

But I digress. You came here to see paper crafts, not my baking :) So back to the toppers. Didn't they turn out adorable.


With MDS they are so easy to make. First you figure out what size you want them to be- I started with a circle that was slightly bigger than my scallop punch. Next I decorated them using my homemade Daniel Tiger DSP and the images I had found online. I wanted to add an individual touch to each of the characters- so I circled them with quotes geared towards a party (if you haven't given it a try yet, create a freeform line and attach a text box to it- the results are Grr-rific!). Then all I had to do was print them up and punch them out. And (depending on your size) you can usually get about 20 of these from a sheet.


I hope you give some customized cupcake toppers a try at your next party!

Pin It!

November 26, 2013

Daniel Tiger Party Favors

We had an awesome time at Elli's 3rd birthday party. I hope you are enjoying hearing all about it (at least the crafty parts of it :) )

Today I want to share with you her party favors. I had seen on Etsy some cute little fry boxes filled with goodies for a party... and I thought "Hey, I can do that." Enter MDS- you know I love it :) - and out comes these adorable little party favors. I filled them up with crayons, reminiscent of the episode where Daniel Tiger goes to the crayon factory, and then printed up booklets of coloring pages for each of the kids (PBSkids.org has some wonderful printable coloring pages available).


Here is what it looks like inside and outside before folding:


I found the fry box template online and turned it into a stamp. If you look on the inside picture you should be able to see it there lightly. In order to fill it in with the DSP I actually set the entire background to the DSP, then overlaid a Freeform layer and colored the areas outside the stamp white. I didn't do the job of a perfectionist as you can see- I figured I was going to cut it out anyway so it didn't matter. Really the only reason to remove the outside areas was to save on ink :)

Want to make your own fry boxes? Subscribe to my blog via email and leave a comment on this post- then I'll send you your own copy of the stamp I used. Hope you enjoy!

Flutterby again soon. I've got a lot more Daniel Tiger Birthday to show you :)

Pin It!

November 22, 2013

You can be a Tiger too...

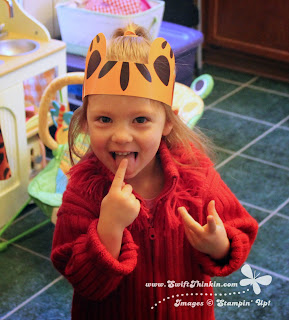
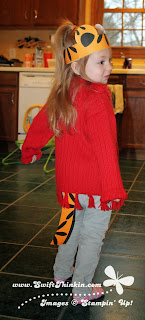
... with this cute headband and tail. Won't your little Daniel Tiger fan just love them :)


Mine sure did! She saw me making these little cuties the night before her party- and insisted on wearing hers RIGHT AWAY! The next morning it was on again way before the party started and it didn't come off without prying :) She even put it on again on Sunday too! LOL what a little cutie.

Designing these in MDS was a cinch. I just used a variety of pretty standard punch shapes- rectangles, ovals, half circles, and a flower. I let the initial version be 'messy' with the parts I wanted to cut off hanging around like this:


But then so that I could fit more on the page and not waste so much space I decided to trim the extras off. In order to do this I exported the 'messy' version to a JPEG. Then, I designed a similar layout using rectangle and circle photoboxes. I grouped them all together and placed my JPEG inside (when you group photoboxes you can add one photo to the whole collection at once). It cropped out all the mess! I was then able to ungroup them and squish them together- it even left me enough room to make a copy of the back of the headband to use as a tail. Woo Hoo! So much fun :)


I hope you enjoyed today's idea!

Pin It!

October 21, 2013

Daniel Tiger Bottle Labels

I learned a long time ago that every party you have with bottle beverages requires bottle labels. Otherwise at the end of the party you walk around collecting a ton of half filled bottles- more than you had of guests because they 'lost' theirs and got a new one.

And besides, they are CUTE- way more fun than the boring labels you buy the bottles with. So here is my take for Daniel Tiger party time:


I started with a square punch that I stretched to be 8" high and as wide as the paper. I filled it with some of my custom DSP from this earlier post. Then I divided it up into 2" strips and decorated them, leaving plenty of room to write a name. Aren't they fun? I can't wait to see what they look like on the water bottles!

Flutterby again soon!

Pin It!

October 14, 2013

Daniel Tiger Birthday Invite

Once I finished up the customized DSP my next step was to surf the net to find some good Daniel Tiger images to use. I found some nice large jpegs of each individual character, and then also some group shots. I was so glad I was able to find some quailty pictures since the show is so new :)

Then I got to work putting together the invite. I used a picture of the 'neighborhood' for the front with some of the song lyrics. Cute right? You can see the cobblestone road that I was trying to recreate in my DSP there too :)


Then for the back I used the adorable image of the group peeking over a ledge. I placed them on a strip of DSP and ribbon as their 'ledge' and then placed an oval mat behind them which I could write the info on (ps- don't everyone show up at this day and time- they are just placeholders until I figure out when we are really scheduling this thing!). I used the 'nifty galifty' freeform tool to make an oval I could tac the RSVP info to also- isn't that a cool feature? Once the words are attached to the shape all I had to do was turn the opacity of the oval to zero and now all you see are the words. Awesomeness :)


Isn't it Grrr-rific as Daniel would say? Well, I hope my daughter likes them- but let's be honest, she just wants the cake :)

Flutterback soon for some more Daniel Tiger inspiration!

Pin It!

October 11, 2013

Daniel Tiger Birthday Party

I've been busy creating for my daughter's birthday party. I 'thought' this year she was going to pick Mickey Mouse... she was after all way into the clubhouse show all summer. But, there was a last minute winner :) She has recently fallen in LOVE with Daniel Tiger. And I have to admit, it is a pretty awesome show for toddlers.
So, when asked what she wanted for her birthday- Mickey or Daniel- the answer was very clear. DANIEL TIGER (combine it with lots of smiles, dancing, and cue music as she sings the song...). The only problem- there is really NO Daniel Tiger birthday supplies out there. He is just to new.

Da da-da DA- MDS to the rescue :)

I started by making some DSP that I could use for the rest of my projects. Check it out.


This one was made to match the colors of all the main characters. I just used the color picking tool on an image of the characters and added a bunch of stripes (i.e. resized square punches). I was really happy with how this turned out, as I often don't do 'random' too well.


This one however is my favorite! I wanted it to look like the cobblestone road that runs through town, which seems iconic of the show since it is in a lot of the shots. Isn't it sweet! I made two personalized punches for the cobblestones. Then filled them with the same colors as the paper above, made them different sizes, and turned down the opacity. It turned out SO SWEET! Love love love.

Both of the papers above are loaded up to my site at full size (12x12 paper at 300 dpi) so feel free to grab a copy. Enjoy! and leave a comment to let me know what you are making with it- I would love to hear about your projects :)

Flutterby again soon to see some of the awesome projects I made using them!

Pin It!